How To Wire A Solar Power System For Home
“How to wire a solar power system for home”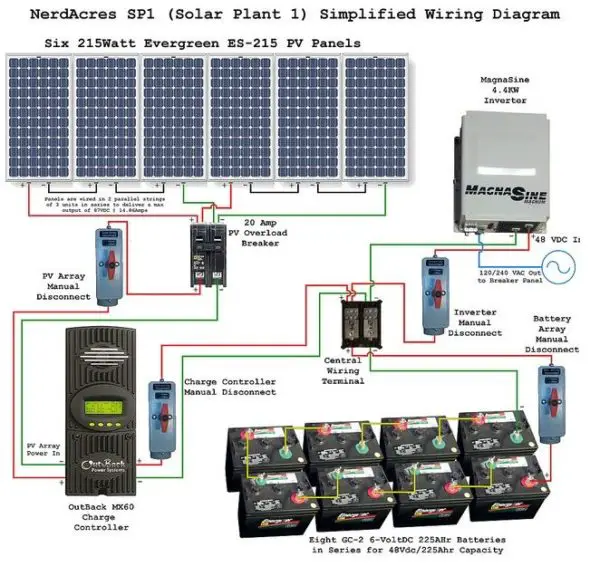
Wiring a solar power system for your home can seem like a daunting task, but with the right guidance, you can successfully install and connect your solar panels to enjoy the benefits of clean energy. In this article, we will walk you through the step-by-step process of wiring a solar power system for your home.
Understanding the Components of a Solar Power System
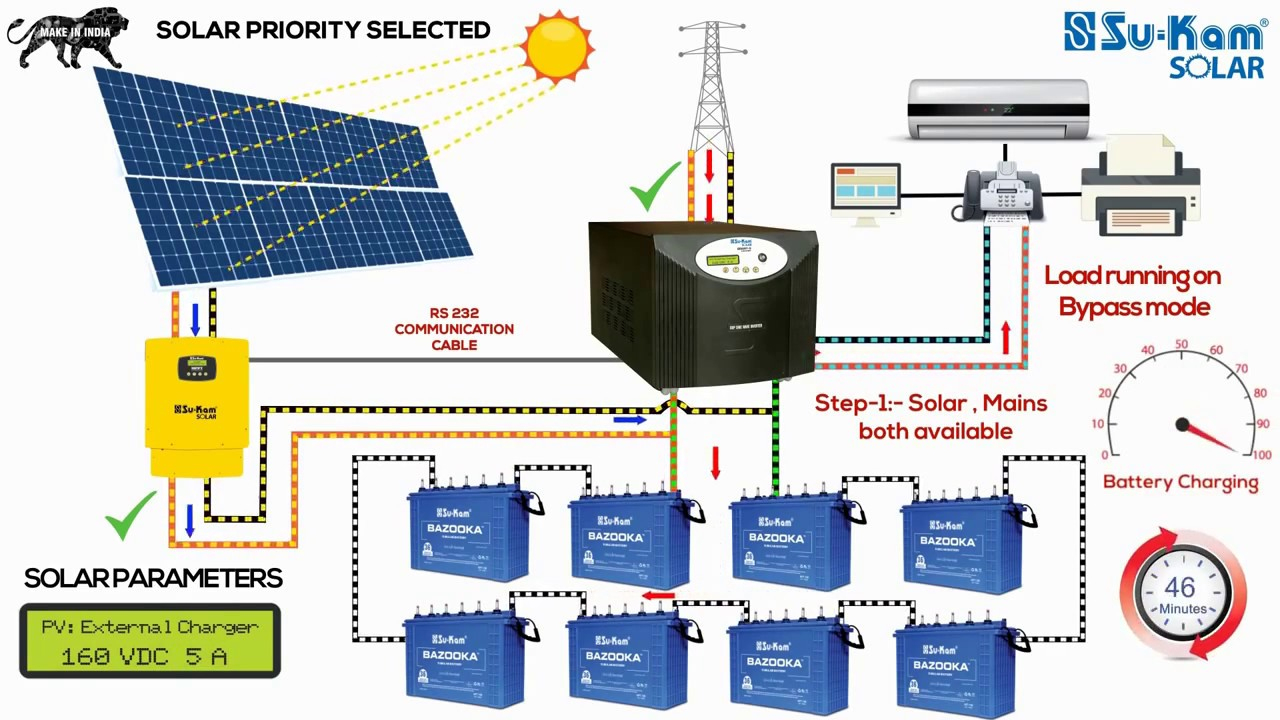
Before we dive into the wiring process, it’s essential to understand the components that make up a solar power system. A typical solar power system consists of:
- Solar Panels: These are the photovoltaic (PV) panels that convert sunlight into electrical energy.
- Mounting System: This includes the frames, clamps, and tracks that secure the solar panels to your roof or ground.
- Inverter: This device converts the DC power generated by the solar panels into AC power that can be used in your home.
- Charge Controller: This component regulates the flow of energy from the solar panels to the battery bank, preventing overcharging and damage.
- Battery Bank: This is a collection of deep cycle batteries that store excess energy generated by the solar panels for later use.
- Electrical Panel: This is the main distribution panel that connects the solar power system to your home’s electrical grid.
Pre-Wiring Considerations
Before starting the wiring process, make sure to consider the following:
- System Size: Determine the size of your solar power system based on your energy needs and available space.
- Roof Condition: Ensure your roof is in good condition and can support the weight of the solar panels and mounting system.
- Local Building Codes: Familiarize yourself with local building codes and regulations regarding solar power systems.
- Electrical System: Verify that your home’s electrical system can handle the additional power generated by the solar panels.

Wiring the Solar Power System
Now that we’ve covered the components and pre-wiring considerations, let’s move on to the wiring process:
Step 1: Connect the Solar Panels
- Series Connection: Connect the solar panels in series by linking the positive terminal of one panel to the negative terminal of the next panel. This will increase the voltage of the system.
- Parallel Connection: Connect the solar panels in parallel by linking the positive terminals of multiple panels together and the negative terminals together. This will increase the current of the system.
- Use MC4 Connectors: Use MC4 connectors to connect the solar panels, as they are specifically designed for solar panel connections.
Step 2: Connect the Solar Panels to the Charge Controller
- Positive and Negative Terminals: Connect the positive terminal of the solar panel array to the positive input terminal of the charge controller, and the negative terminal to the negative input terminal.
- Use the Correct Gauge Wire: Use the correct gauge wire to connect the solar panels to the charge controller, as specified by the manufacturer.
Step 3: Connect the Charge Controller to the Battery Bank
- Positive and Negative Terminals: Connect the positive output terminal of the charge controller to the positive terminal of the battery bank, and the negative output terminal to the negative terminal of the battery bank.
- Use the Correct Gauge Wire: Use the correct gauge wire to connect the charge controller to the battery bank, as specified by the manufacturer.
Step 4: Connect the Battery Bank to the Inverter
- Positive and Negative Terminals: Connect the positive terminal of the battery bank to the positive input terminal of the inverter, and the negative terminal to the negative input terminal.
- Use the Correct Gauge Wire: Use the correct gauge wire to connect the battery bank to the inverter, as specified by the manufacturer.
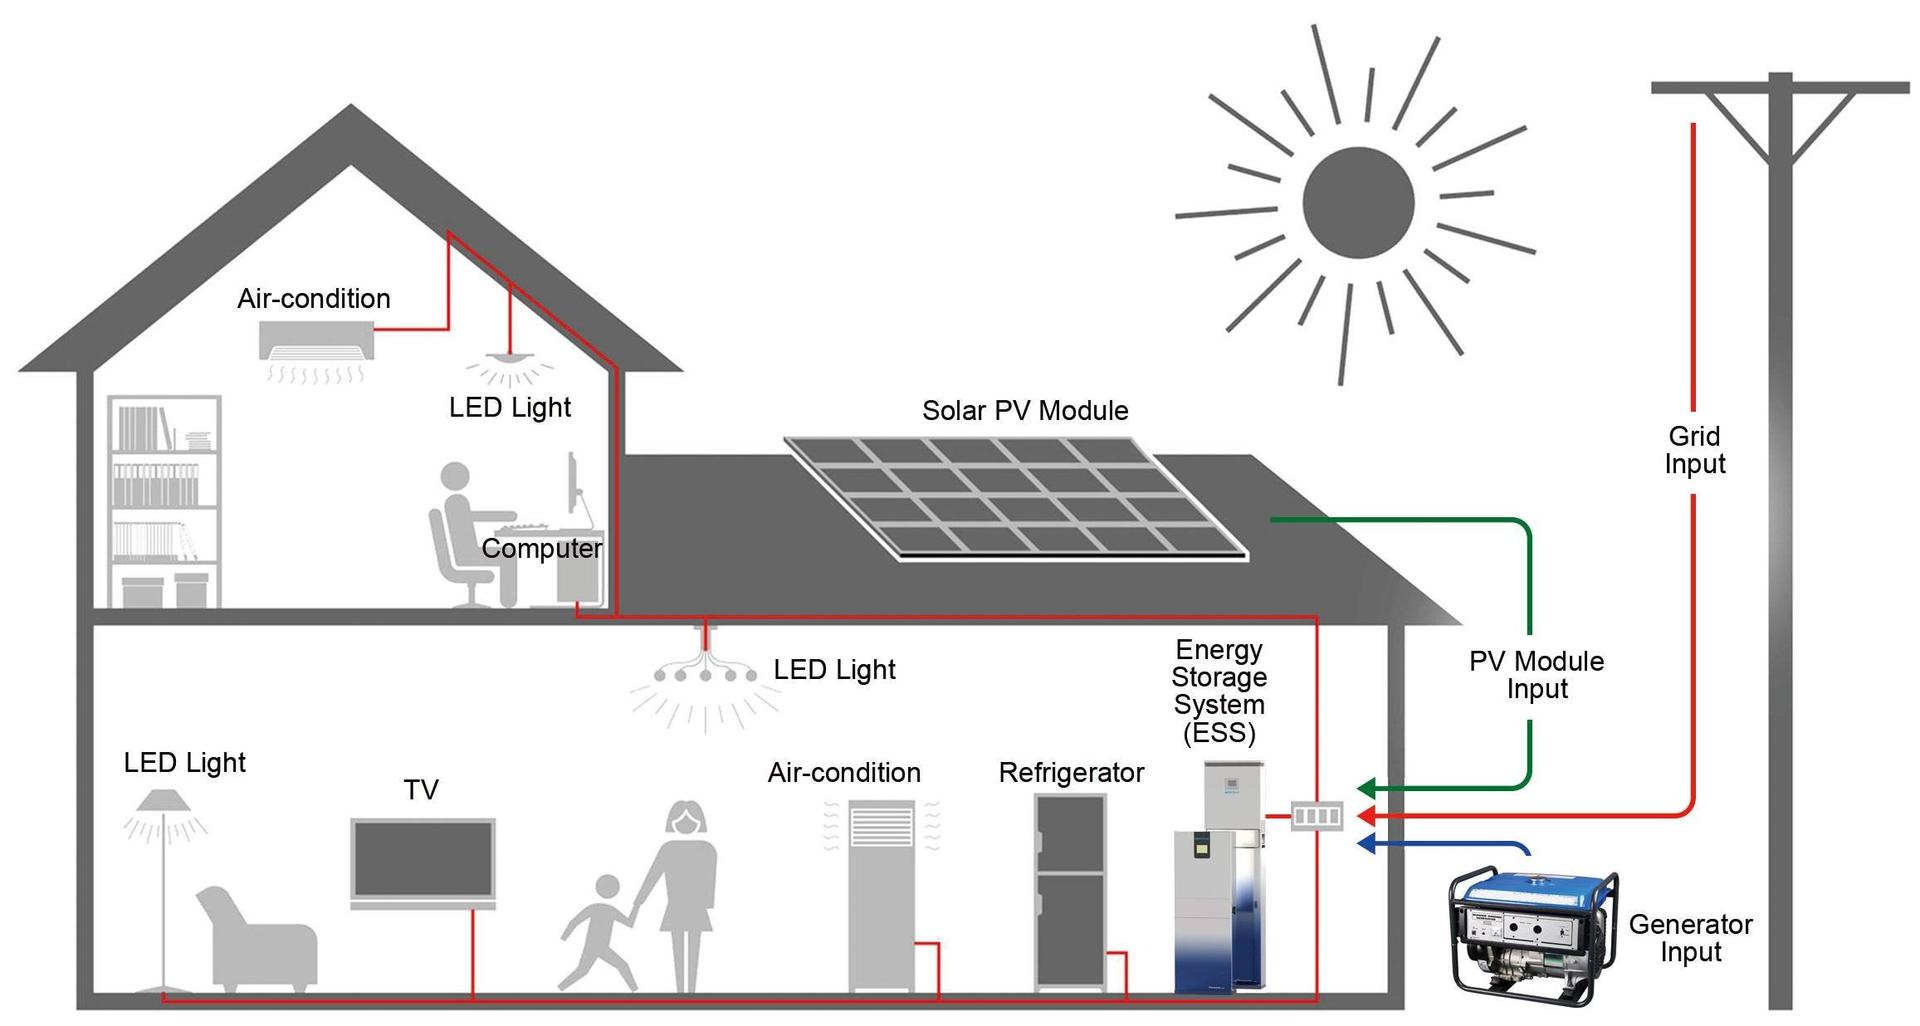
Step 5: Connect the Inverter to the Electrical Panel
- AC Output: Connect the AC output of the inverter to the electrical panel, making sure to follow the manufacturer’s instructions.
- Use the Correct Gauge Wire: Use the correct gauge wire to connect the inverter to the electrical panel, as specified by the manufacturer.
Safety Considerations
When wiring a solar power system, safety should be your top priority. Make sure to:
- Turn off the Power: Turn off the power to the electrical panel and solar power system before starting the wiring process.
- Use Personal Protective Equipment: Wear personal protective equipment, such as gloves and safety glasses, when working with electrical systems.
- Follow Manufacturer Instructions: Follow the manufacturer’s instructions for each component, as they may have specific wiring and installation requirements.
- Hire a Professional: If you’re not experienced in electrical work, consider hiring a professional to install and wire your solar power system.
Conclusion
Wiring a solar power system for your home can be a complex process, but with the right guidance and precautions, you can successfully install and connect your solar panels to enjoy the benefits of clean energy. Remember to consider the components, pre-wiring considerations, and safety guidelines outlined in this article to ensure a safe and efficient installation. By following these steps and taking the necessary precautions, you can harness the power of the sun to reduce your energy costs and carbon footprint.
Additional Tips and Recommendations
- Monitor Your System: Install a monitoring system to track the performance of your solar power system and identify any issues.
- Perform Regular Maintenance: Perform regular maintenance on your solar power system to ensure it operates at peak efficiency.
- Consider Energy Storage: Consider adding energy storage, such as a battery bank, to store excess energy generated by your solar panels.
- Research Local Incentives: Research local incentives and rebates for solar power systems, as they can help offset the initial investment.
By following these tips and recommendations, you can maximize the benefits of your solar power system and enjoy a sustainable, renewable energy source for years to come.