“How to wire a 12V solar power system in your RV”
However, with the freedom of RV travel comes the need for reliable and efficient power systems. One of the most popular and cost-effective ways to power your RV is with a 12V solar power system. In this article, we’ll take you through the process of wiring a 12V solar power system in your RV, providing you with a comprehensive guide to help you get started.
Why Choose Solar Power for Your RV?
Before we dive into the wiring process, let’s take a look at why solar power is an attractive option for RV owners. Solar power offers several benefits, including:
- Renewable Energy Source: Solar power is a clean and renewable energy source, reducing your reliance on fossil fuels and minimizing your carbon footprint.
- Cost-Effective: Solar power can save you money in the long run by reducing your energy costs and extending the life of your RV’s batteries.
- Increased Mobility: With a solar power system, you can boondock (camp without hookups) for extended periods, giving you the freedom to explore remote areas without worrying about finding a power source.
- Low Maintenance: Solar panels require minimal maintenance, and with a properly installed system, you can enjoy years of trouble-free operation.
Components of a 12V Solar Power System
Before we begin wiring your solar power system, let’s take a look at the components you’ll need:
- Solar Panels: These convert sunlight into electrical energy. For a 12V system, you’ll typically use panels with a voltage rating of 12V to 20V.
- Charge Controller: This device regulates the flow of energy from the solar panels to the batteries, preventing overcharging and ensuring safe operation.
- Deep Cycle Batteries: These batteries are designed to handle the deep discharge cycles common in RV applications.
- Inverter/Charger: This device converts DC power from the batteries to AC power for your RV’s appliances and charges the batteries from an external power source (e.g., shore power or a generator).
- Wiring and Connectors: You’ll need wiring, connectors, and fuses to connect the various components of your solar power system.
Wiring Your 12V Solar Power System
Now that we’ve covered the components, let’s move on to the wiring process. Please note that this is a general guide, and you should consult your RV’s manual and the manufacturer’s instructions for specific wiring recommendations.
Step 1: Plan Your System
Before you start wiring, take some time to plan your system. Consider the following factors:
- Power Requirements: Calculate your RV’s power requirements based on the appliances and devices you’ll be using.
- Solar Panel Size and Number: Determine the number and size of solar panels you’ll need to meet your power requirements.
- Battery Bank Size: Calculate the size of your battery bank based on your power requirements and the depth of discharge you’re willing to accept.
- Inverter/Charger Size: Choose an inverter/charger that can handle the maximum power requirements of your RV.
Step 2: Mount the Solar Panels
Mount the solar panels on your RV’s roof, ensuring they’re securely fastened and angled for optimal energy production. Make sure to follow the manufacturer’s instructions for mounting the panels.
Step 3: Connect the Solar Panels
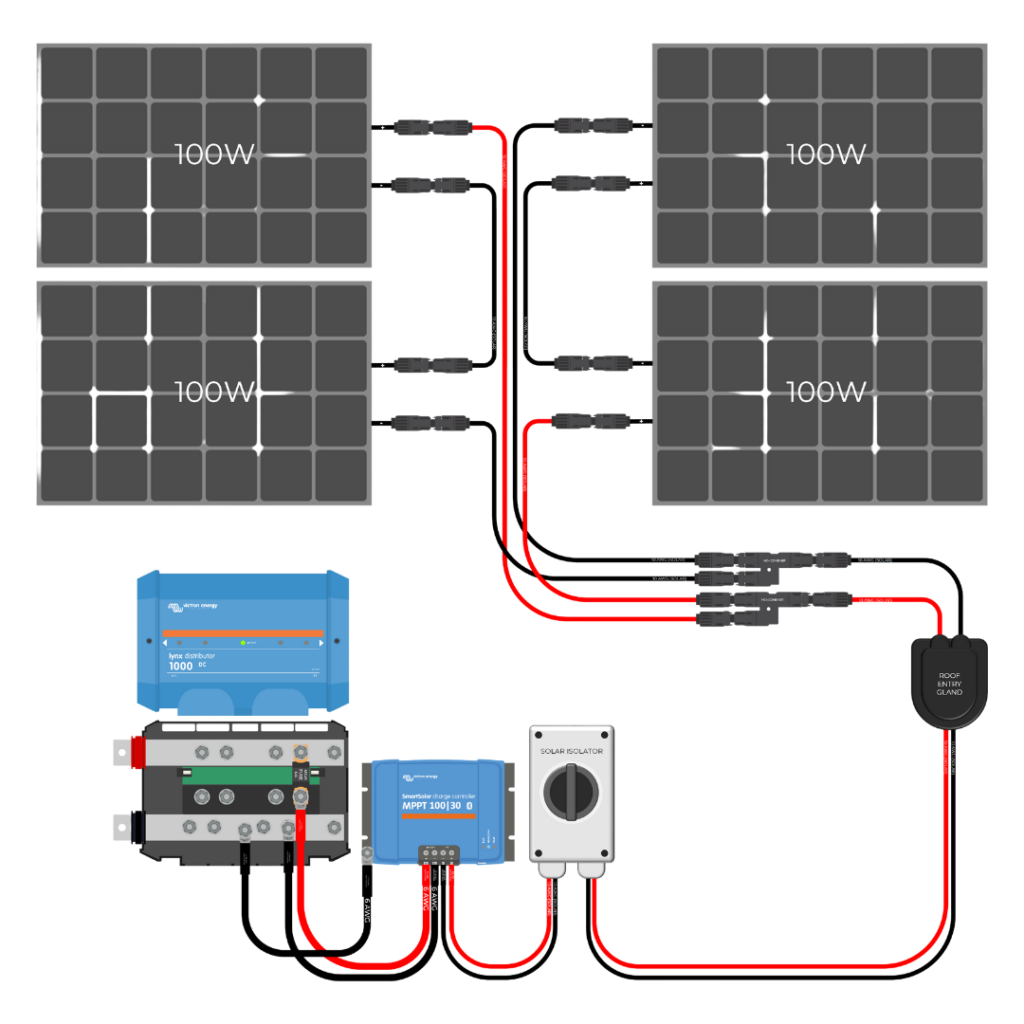
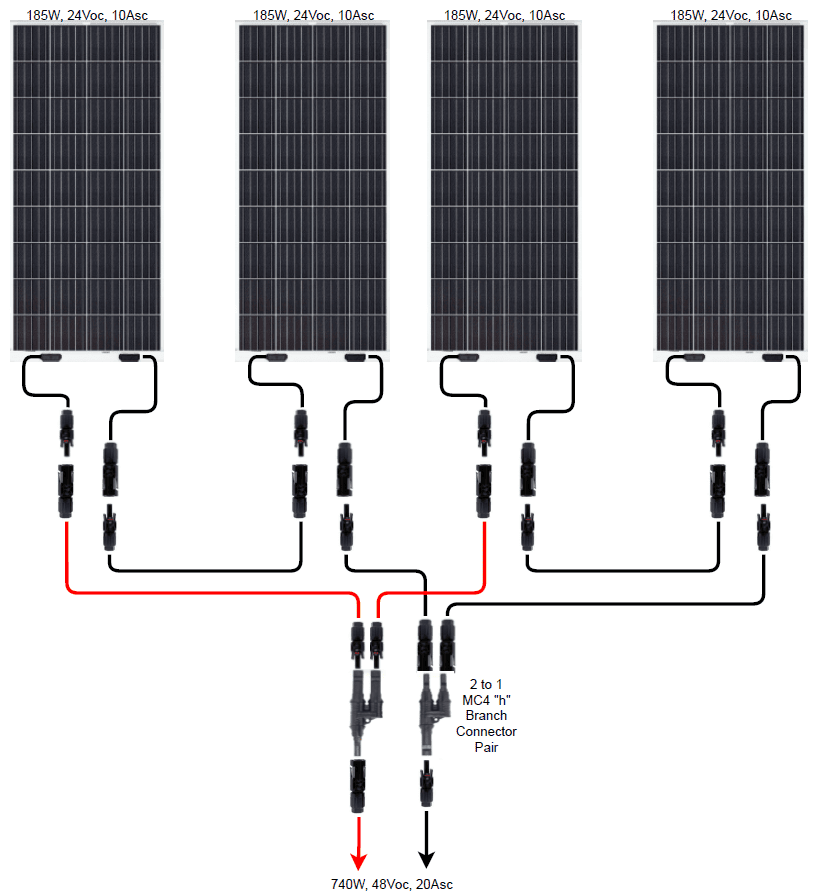
Connect the solar panels in series or parallel, depending on your system’s requirements. For a 12V system, you’ll typically connect the panels in series to achieve the desired voltage.
Step 4: Install the Charge Controller
Mount the charge controller in a convenient location, such as near the battery bank or in a dedicated electronics compartment. Follow the manufacturer’s instructions for connecting the charge controller to the solar panels and battery bank.
Step 5: Connect the Battery Bank
Connect the battery bank to the charge controller, ensuring the polarity is correct (positive to positive, negative to negative). Use heavy-gauge wiring and appropriate connectors to minimize voltage drop and ensure safe operation.
Step 6: Install the Inverter/Charger
Mount the inverter/charger in a convenient location, such as near the battery bank or in a dedicated electronics compartment. Follow the manufacturer’s instructions for connecting the inverter/charger to the battery bank and your RV’s electrical system.
Step 7: Connect the Load Center
Connect the load center (a distribution panel that protects and controls the flow of electrical power to your RV’s appliances) to the inverter/charger. Ensure the wiring is sized correctly and meets the American Wire Gauge (AWG) requirements for your system.
Step 8: Test the System
Once you’ve completed the wiring, test the system to ensure it’s functioning correctly. Check the voltage and current output of the solar panels, charge controller, and inverter/charger. Verify that the system is charging the batteries and providing power to your RV’s appliances.
Safety Considerations
When working with electrical systems, safety is paramount. Always follow these guidelines:
- Turn off the power: Before starting work, ensure the solar power system is turned off and disconnected from the battery bank and load center.
- Use proper protective gear: Wear protective gear, such as gloves and safety glasses, when working with electrical components.
- Follow manufacturer instructions: Consult the manufacturer’s instructions for specific wiring recommendations and guidelines.
- Hire a professional: If you’re not comfortable with the wiring process, consider hiring a professional to ensure your system is installed and wired correctly.
Conclusion
Wiring a 12V solar power system in your RV requires careful planning, attention to detail, and a basic understanding of electrical systems. By following this guide, you’ll be well on your way to enjoying the benefits of solar power and exploring the great outdoors with confidence. Remember to always follow safety guidelines and consult the manufacturer’s instructions to ensure your system is installed and wired correctly. Happy camping!


