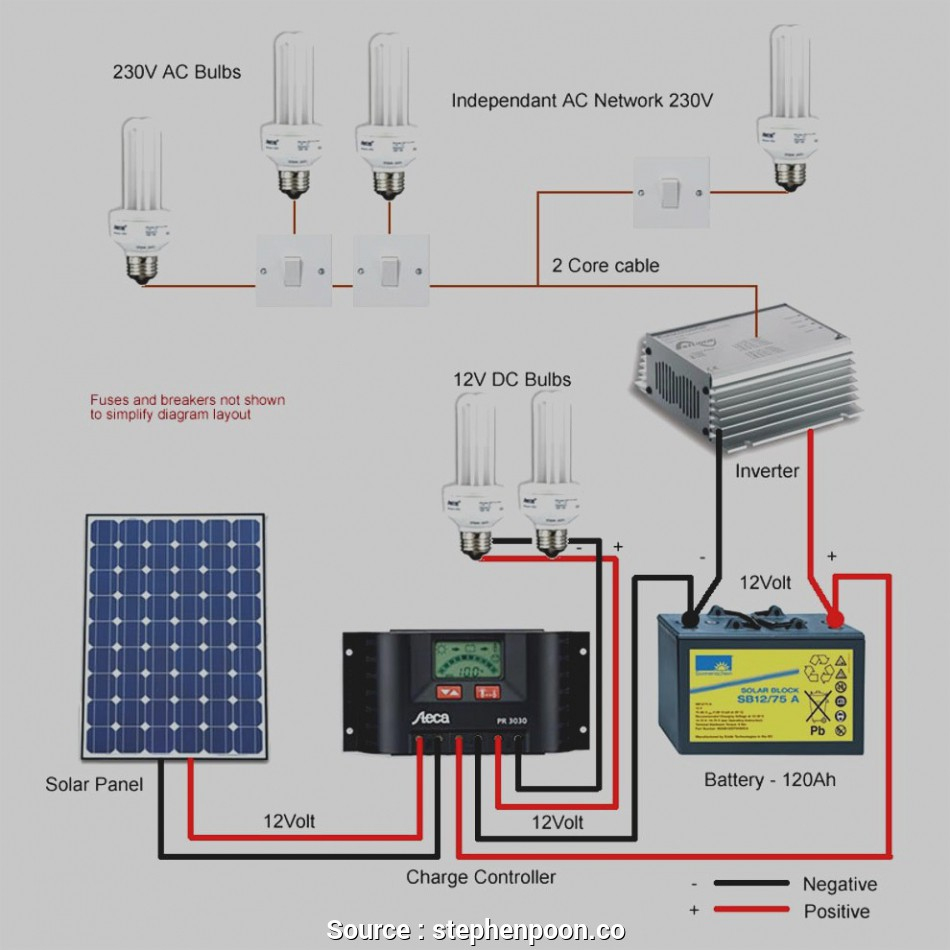
“Simple home solar panel wiring layout”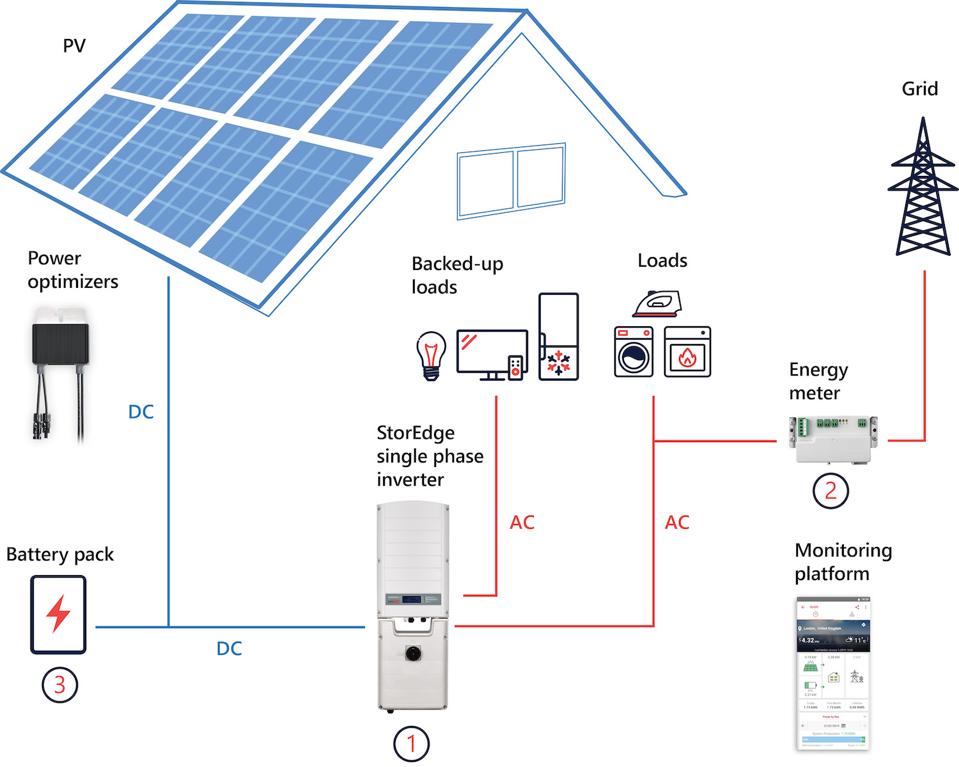
Not only does it reduce your reliance on the grid, but it also helps to minimize your carbon footprint. However, installing a solar panel system can seem like a daunting task, especially when it comes to the wiring layout. In this article, we will provide a detailed guide on simple home solar panel wiring layout, helping you to navigate the process with ease.
Understanding the Basics
Before we dive into the wiring layout, it’s essential to understand the basic components of a solar panel system. These include:
- Solar Panels: These are the photovoltaic (PV) panels that convert sunlight into electrical energy.
- Charge Controller: This device regulates the flow of energy from the solar panels to the battery bank.
- Battery Bank: This is a collection of deep cycle batteries that store excess energy generated by the solar panels.
- Inverter: This device converts the DC power from the solar panels or battery bank into AC power, which can be used to power your home.
- Load Center: This is the main electrical panel that distributes power to various circuits in your home.
Wiring Layout Components
When it comes to the wiring layout, there are several components that you need to consider. These include:
- Solar Panel Connectors: These are used to connect the solar panels to the charge controller.
- MC4 Connectors: These are used to connect the solar panels to the charge controller and the inverter.
- 10 AWG Wire: This is a heavy-duty wire used to connect the solar panels to the charge controller and the inverter.
- 8 AWG Wire: This is a smaller gauge wire used to connect the inverter to the load center.
- Grounding Rod: This is a metal rod that connects the solar panel system to the earth, providing a safe path to ground.
Step-by-Step Wiring Layout Guide
Now that we have covered the basic components and wiring layout components, let’s move on to the step-by-step guide.

- Connect the Solar Panels: Begin by connecting the solar panels to each other in series or parallel, depending on your system design. Use solar panel connectors to connect the panels to a single output cable.
- Connect the Solar Panels to the Charge Controller: Use MC4 connectors to connect the output cable from the solar panels to the charge controller. Make sure to match the polarity of the connectors to avoid any damage to the system.
- Connect the Charge Controller to the Battery Bank: Use 10 AWG wire to connect the charge controller to the battery bank. Ensure that the wire is long enough to reach from the charge controller to the battery bank.
- Connect the Battery Bank to the Inverter: Use 10 AWG wire to connect the battery bank to the inverter. Again, ensure that the wire is long enough to reach from the battery bank to the inverter.
- Connect the Inverter to the Load Center: Use 8 AWG wire to connect the inverter to the load center. This wire should be sized according to the inverter’s output rating.
- Ground the System: Use a grounding rod to connect the solar panel system to the earth. This provides a safe path to ground in case of any electrical faults.
Safety Considerations
When working with electrical systems, safety should always be your top priority. Here are some safety considerations to keep in mind:
- Use proper personal protective equipment (PPE): Always wear protective gear, such as gloves and safety glasses, when working with electrical systems.
- Ensure proper grounding: Make sure that the system is properly grounded to prevent any electrical shocks.
- Use the correct wire size: Use the correct wire size for each connection to avoid any overheating or electrical fires.
- Follow local electrical codes: Always follow local electrical codes and regulations when installing a solar panel system.
Troubleshooting Common Issues
If you encounter any issues with your solar panel system, here are some troubleshooting tips to help you identify and resolve the problem:
- Low voltage output: Check the solar panels for any shading or blockages. Ensure that the charge controller is properly configured and that the battery bank is fully charged.
- High voltage output: Check the inverter for any faults or errors. Ensure that the wire size is correct and that the system is properly grounded.
- System not turning on: Check the charge controller for any errors or faults. Ensure that the solar panels are properly connected and that the battery bank is fully charged.
Conclusion
In conclusion, a simple home solar panel wiring layout can be achieved with the right knowledge and components. By following the step-by-step guide and taking safety considerations into account, you can ensure a successful installation. Remember to always follow local electrical codes and regulations, and to troubleshoot any common issues that may arise. With a well-designed solar panel system, you can enjoy the benefits of renewable energy and reduce your reliance on the grid.
Recommendations
If you’re new to solar panel installations, it’s recommended that you:
- Hire a professional: Consider hiring a licensed electrician or solar panel installer to ensure a safe and successful installation.
- Use high-quality components: Invest in high-quality components, such as solar panels, charge controllers, and inverters, to ensure a reliable and efficient system.
- Monitor your system: Regularly monitor your system’s performance to ensure that it’s operating at optimal levels.
By following these recommendations and taking the necessary precautions, you can enjoy the benefits of a simple home solar panel wiring layout and contribute to a more sustainable future.
Additional Resources
For more information on solar panel installations and wiring layouts, you can refer to the following resources:
- National Electric Code (NEC): The NEC provides guidelines and regulations for electrical installations, including solar panel systems.
- International Association of Electrical Inspectors (IAEI): The IAEI provides educational resources and training for electrical inspectors and installers.
- Solar Energy Industries Association (SEIA): The SEIA provides information and resources on solar energy, including installations and policy advocacy.
By taking the time to understand the basics of solar panel systems and following the guidelines outlined in this article, you can create a simple and effective home solar panel wiring layout that meets your energy needs and contributes to a more sustainable future.


