“Grid-tied home solar wiring diagram”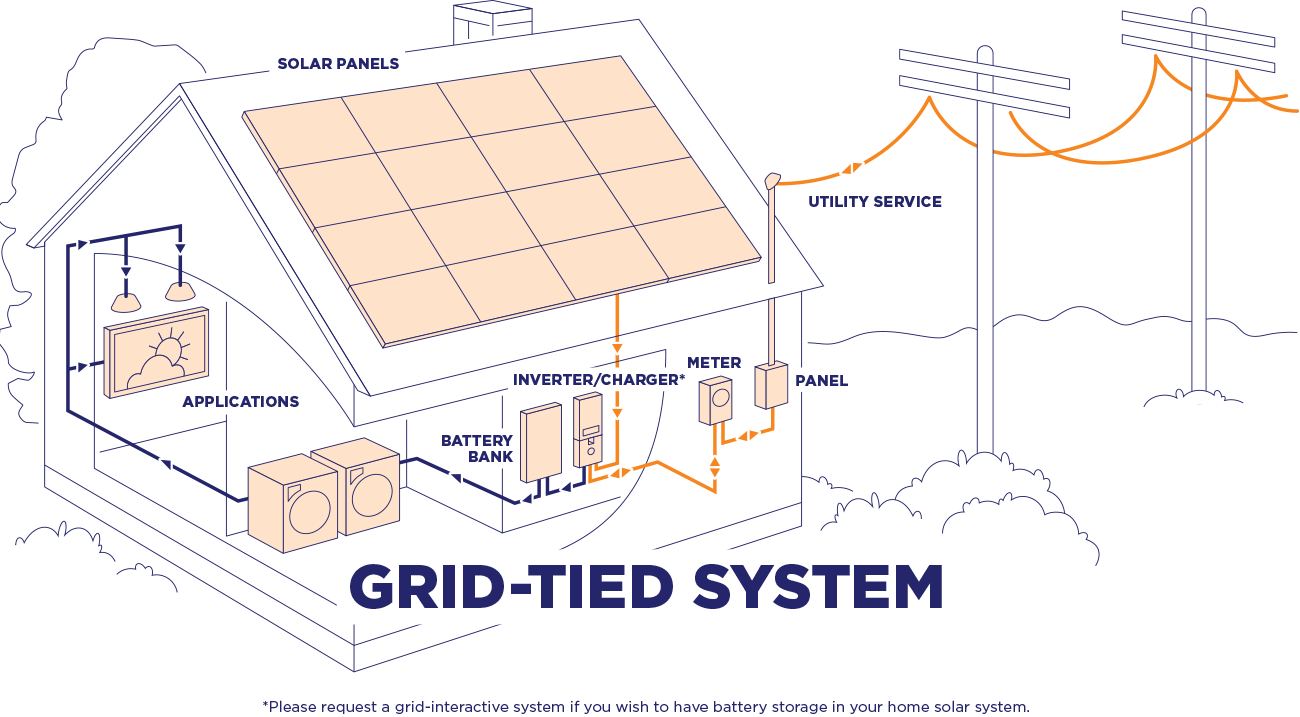
A grid-tied home solar system allows you to generate your own electricity while still being connected to the utility grid. This system provides a reliable and efficient way to reduce your energy bills and carbon footprint. In this article, we will provide a comprehensive guide to creating a grid-tied home solar wiring diagram, including the necessary components, safety considerations, and step-by-step instructions.
Introduction to Grid-Tied Home Solar Systems
A grid-tied home solar system, also known as a grid-connected or utility-interactive system, is a type of solar power system that connects to the utility grid. This system uses solar panels to generate electricity, which is then fed into the grid through an inverter. The inverter converts the DC power from the solar panels into AC power, which is compatible with the grid. When your solar system generates more electricity than your home uses, the excess energy is sold back to the utility company, offsetting your energy bills.
Components of a Grid-Tied Home Solar System
To create a grid-tied home solar system, you will need the following components:
- Solar Panels: These are the primary source of energy for your system. You can choose from monocrystalline, polycrystalline, or thin-film solar panels, depending on your budget and energy requirements.
- Inverter: This device converts the DC power from the solar panels into AC power, which is compatible with the grid.
- Mounting System: This includes the racks, clips, and other hardware needed to secure the solar panels to your roof or ground mount.
- Charge Controller: This device regulates the flow of energy between the solar panels and the inverter.
- AC Disconnect: This is a safety device that disconnects the solar system from the grid in case of a power outage or maintenance.
- Grounding System: This includes the grounding rods, clips, and wire needed to ensure the system is properly grounded.
- Wiring and Connectors: These include the cables, connectors, and junction boxes needed to connect the various components.
Safety Considerations
Before creating a grid-tied home solar wiring diagram, it’s essential to consider the following safety precautions:
- Electrical Shock: Solar panels and inverters can produce electrical shock hazards. Ensure that all wiring and connections are properly insulated and meet local electrical codes.
- Fire Risk: Solar panels and wiring can be a fire hazard if not properly installed. Ensure that all components are installed and maintained according to manufacturer instructions.
- Grounding: Proper grounding is essential to prevent electrical shock and ensure the system operates safely.
- Arc Fault Protection: This device protects against electrical arcing, which can cause fires or electrical shock.

Grid-Tied Home Solar Wiring Diagram
Here is a basic grid-tied home solar wiring diagram:
Solar Array
- Solar panels are connected in series and parallel to form a solar array.
- The solar array is connected to a charge controller, which regulates the flow of energy to the inverter.
Inverter
- The inverter is connected to the solar array and the AC disconnect.
- The inverter converts the DC power from the solar array into AC power, which is compatible with the grid.
AC Disconnect
- The AC disconnect is connected to the inverter and the grid.
- The AC disconnect is a safety device that disconnects the solar system from the grid in case of a power outage or maintenance.
Grounding System
- The grounding system includes grounding rods, clips, and wire.
- The grounding system is connected to the solar array, inverter, and AC disconnect.
Wiring and Connectors
- The wiring and connectors include the cables, connectors, and junction boxes needed to connect the various components.
- The wiring and connectors must meet local electrical codes and be properly insulated to prevent electrical shock.
Step-by-Step Instructions
Here are the step-by-step instructions for creating a grid-tied home solar wiring diagram:
- Determine the System Size: Determine the size of your solar system based on your energy needs and budget.
- Choose the Components: Choose the solar panels, inverter, mounting system, charge controller, AC disconnect, and grounding system based on your system size and requirements.
- Create the Solar Array: Connect the solar panels in series and parallel to form a solar array.
- Connect the Charge Controller: Connect the solar array to a charge controller, which regulates the flow of energy to the inverter.
- Connect the Inverter: Connect the inverter to the solar array and the AC disconnect.
- Connect the AC Disconnect: Connect the AC disconnect to the inverter and the grid.
- Connect the Grounding System: Connect the grounding system to the solar array, inverter, and AC disconnect.
- Connect the Wiring and Connectors: Connect the wiring and connectors to the various components, ensuring that all connections are properly insulated and meet local electrical codes.
- Test the System: Test the system to ensure that it is operating safely and efficiently.
Conclusion
Creating a grid-tied home solar wiring diagram requires careful planning, attention to safety precautions, and adherence to local electrical codes. By following the steps outlined in this article, you can create a reliable and efficient grid-tied home solar system that reduces your energy bills and carbon footprint. Remember to consult with a licensed electrician or solar installer if you are unsure about any aspect of the installation process. With the right components and installation, you can enjoy the benefits of solar power for years to come.
Additional Resources
For more information on grid-tied home solar systems and wiring diagrams, you can consult the following resources:
- National Electric Code (NEC): The NEC provides guidelines for electrical wiring and safety.
- International Association of Electrical Inspectors (IAEI): The IAEI provides resources and training for electrical inspectors and installers.
- Solar Energy Industries Association (SEIA): The SEIA provides resources and information on solar energy and installation best practices.
- Local Electrical Codes: Check with your local government for specific electrical codes and regulations in your area.
By following the guidelines and resources outlined in this article, you can create a safe and efficient grid-tied home solar wiring diagram that meets your energy needs and budget.


